GESSO BOARD & PIGMENT TESTING
Name: Ana with Marjolin BolDate and Time:
2015.10.5, [am/pm]
Location: Lab 260Subject: Making the gesso ground, applying first layers to the hardboard
| 2015_001fall_labsem_Estrades_Makinggesso_FA2015_1 |
Table of Contents
- In a jar, mix the animal glue (rabbit) with water (do not stir), it was in the fridge overnight.
- Then, boil it down in the right temperature, between 40 and 60, so that it doesn't lose its properties. Champagne chalk is then added by filtering, pouring it slowly (see photo above)
- The process involves saturating the glue with chalk particles.
- You will know it is ready when a small pile forms on top. The glue acquires density and whiteness with the chalk (gesso).
- You can stir the gesso with a wooden stick, also keep it warm so that stays liquid to brush the board.
Before applying several layers of gesso (3), the board was sanded front and back, then a thin isolation layer (just water and glue, not chalk) was applied and let to dry.
After the first layer, we apply water back of the board to balance the applications front and back.
With every new layer, the board is sanded again to even the surface. Each application is done in one direction, horizontal/ vertical.
NOTE: Every layer takes about 40 minutes to dry, so 3 layers took me approximately 3 hours, sanding and applying gesso to create a new layer!
In the meantime, grounded some madder root in the mortar, and I realized once again how labour intensive the Renaissance workshop must have been. Also, it is pretty logical, but good to be reminded that it is very important to use the right tools: for this task the little mortar was not as adequate (more effort with little result), however the bigger mortar was used by another classmate.
| 2015_001fall_labsem_Estrades_MadderLake_FA2015_1 |
Name: Ana and Emilie
Date and Time:
2015.10.8, 2.30- 5 pm
Location: LAB 260Subject: More layers of gesso, making Madder Lake pigment
- Applied other 4 layers of gesso with the hog hair brush (much harder and so it applies the layer more thinly than with the softer goat hair brush)
- A total of 8 layers should be applied, but so far I have done 7, and I still need to do over an hour of sanding before my board is ready
- In waiting for the layers of gesso to dry, Emilie and I did madder lake pigment
Madder Lake Pigment (see Naomi's notes: http://making-and-knowing.wikischolars.columbia.edu/Workshop+-+Madder+Pigment+Making+FA15)
- Jar of Madder root (Sample D - 10x the original recipe - 20g) in a tin bowl to heat in water bath
- After an hour and a half, at 4:52pm, it reached 70C. We filtered the contents into beaker
- Added 10g of Potash Alum
- 17:08 after 80C is reached, the Madder + potash alum is poured into alkaline solution (potassium carbonate)
- Tested PH was neutral, between 6-7.
- Now, we leave it to settle overnight, then it would be filtered and washed several times before we can get an amount of ground pigment
 |
| 2015_001fall_labsem_Foyer_MadderLake_FA2015_5.jpg |
Name: Ana with Marjolin Bol
Date and Time:
2015.10.12, 9:30 am/ pm
Location: Lab 260Subject: Sanding and pigment tests on gesso board
- Sanded for over an hour and applied an isolation layer (same rabbit glue)
- After dividing the board in half with tape, divided one side into 40 smaller test squares and numbered the grid
- Applied different paint on the grids of the gesso board:
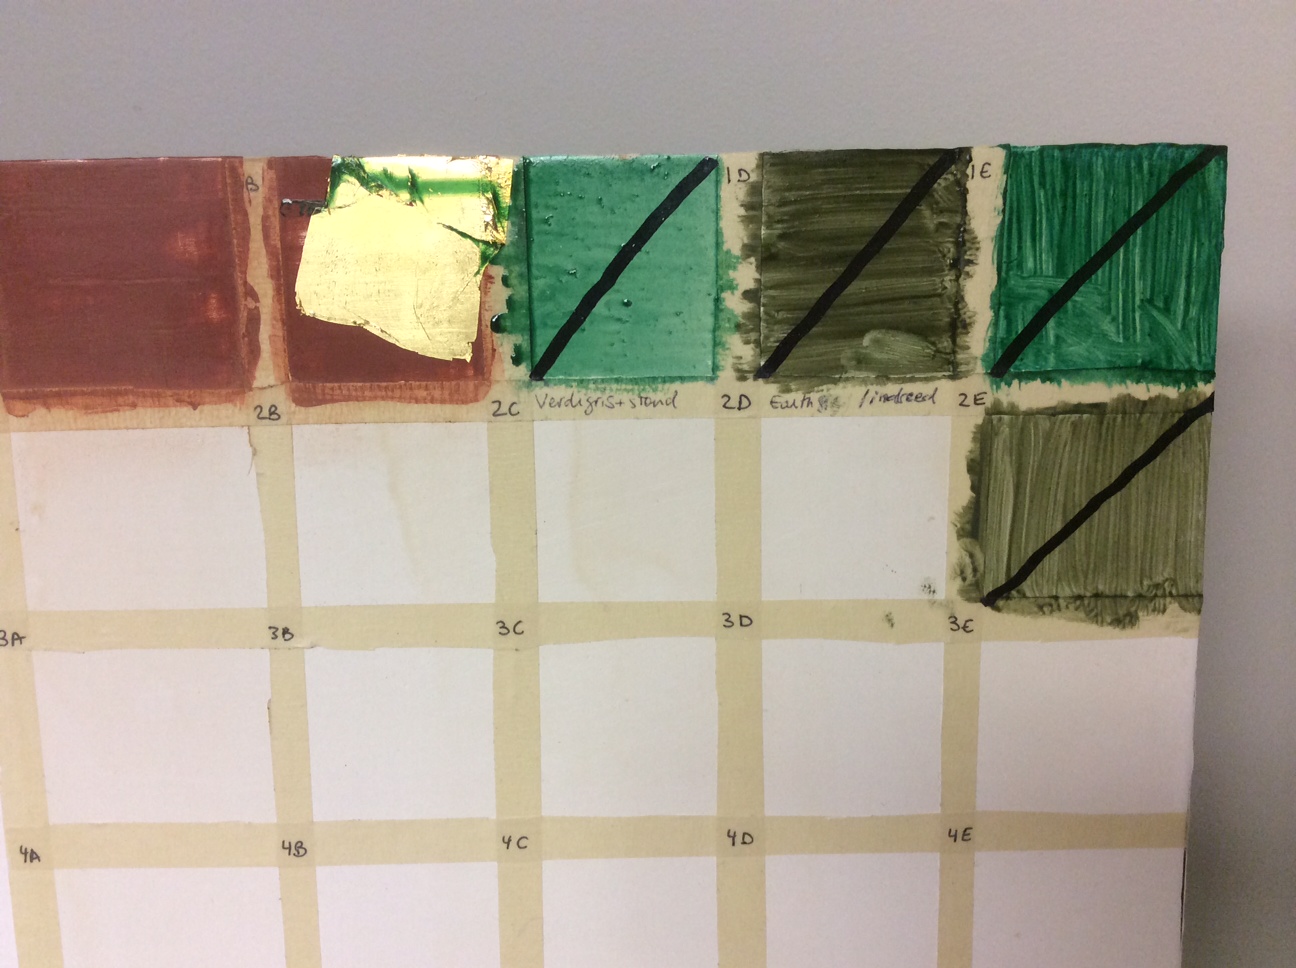
1A. 4 layers of red bole
- made bole with Marjolin: red bole, natural earth from Germany, made a paste, grinding it with the glass peddler
- heated rabbit skin glue, added small amount of glue to bole mixture until it is an even consistency
- applied 4 coats to 1A. However, the pigment was uneven, so I decided to do the gilding and applied the bole again in 1B
Name: Ana with Marjolin Bol
2015.October.15, 3-5:30pm
Location: Lab 260Subject: Gilding and Testing pigments
1C+1D. Verdigris and green earth respectively, mixed with linseed oil;
1E+2E. Verdigris and green earth with stand oil.
NOTE: The black marker line allows for comparing the refractive index of the paints. All paints are translucent, all black lines visible.
1B. Gilding (after a basis of bole)
- Painted 3 layers 1B, sanded with 1000 grit sandpaper, then polished with the burnisher (agate head) to get it ready for gilding (very smooth to the touch)
- Picked gold leaf with knife, laid on pillow to cut, picked up with brush to place in square, after applying a glue coating
- It did not come out well, because I did it at the end of a workshop day, and Marjolin and I couldn't repair it with other gold leaf before leaving, so I hope to gild another square.
NOTE: Unfortunately, I left the board to dry on the side, thinking that the paint had already dried, but it dripped on the gilded square (see picture below) In any case, I would like to repeat the gilding process, if time allows.
 |
| 2015_001fall_labsem_Estrades_boardpigment tests_FA2015_1 |
ASPECTS TO KEEP IN MIND WHEN MAKING FIELD NOTES
- note time
- note (changing) conditions in the room
- note temperature of ingredients to be processed (e.g. cold from fridge, room temperature etc.)
- document materials, equipment, and processes in writing and with photographs
- notes on ingredients and equipment (where did you get them? issues of authenticity)
- note precisely the scales and temperatures you used (please indicate how you interpreted imprecise recipe instruction)
- see also our informal template for recipe reconstructions